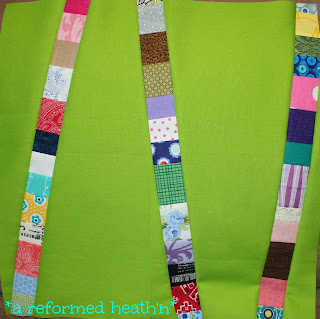
My Samantha re-named this tutorial as I was finalizing the posts, and I liked it, so I'm going with it ... (drum roll please) ... Random Bamboo!
My inspiration for this block came from this picture from Amanda Jean's blog, Crazy Mom Quilts. When I saw her Bright Birch Trees, I knew it was the perfect block for Stash Bee. She does have the pattern for this quilt here, but I saw it and had to do my own version. I have not seen her pattern or directions, but present to you a tutorial that I developed based on her idea.
My inspiration for this block came from this picture from Amanda Jean's blog, Crazy Mom Quilts. When I saw her Bright Birch Trees, I knew it was the perfect block for Stash Bee. She does have the pattern for this quilt here, but I saw it and had to do my own version. I have not seen her pattern or directions, but present to you a tutorial that I developed based on her idea.

Scrappy Strips Block Tutorial:
I am going for a 15" square finished block (15-1/2" unfinished.) I will do all the trimming once I get all the blocks. Each block should have 3 strips no thinner than 1/2" wide finished (1" unfinished) and no wider than 2-1/2" wide finished (3" unfinished.) They can all be the same width or all different. Please try to make them NOT parallel.
Supplies:
at least a 16" (long) x 14" (wide) base block--any solid of your choice
Miscellaneous scraps of varying sizes and colors
The Base Block:
The thinner you want to make your strips, the larger your base block will need to be. If you were to do all 1/2-inch strips, you'd want to start with at least 16" square or even larger to allow for seam allowances and trimming. Also, if you use the smaller 16" measurement for the length, you'll have to be more careful about aligning the pieces after you add the scrappy strips. If you've never done wonky or improv, go bigger to allow for the learning curve.
Make the Scrappy Strips (3 of 'em):
Once I cut my base block, I went through my scrap pile to find colors I thought would look good. I decided to coordinate a little--feel free to go totally scrappy if you choose. No need for straight lines here--vary sizes and colors. Press the seams open as you go. This helps the small pieces to lie flatter.
When your strip is about 18" long, trim up the sides. The strips don't have to be an exact width but, again, no thinner than 1" and no wider than 3". The extra length is needed when adding the strips onto the solid block at wonky angles.
I chose to go with three separate piles to use as many different fabrics as possible. Alternatively, you could make one wider, single strip, then cut all 3 strips from the same base (shown below.) Once I chose the scraps, I trimmed them to about 7". This gave me enough room for trimming the ends even plus 3 strips--1.5", 2" & 2.5" wide. You can adjust the width or the sizes of the strip you cut as you desire.
Attach the Strips to the solid Base:
The procedure is the same for sewing on each of the three strips. I worked one at a time to keep it simple.
I found that starting in the center of the solid base block helped me to see the spacing a little bit better. Lay down one of your strips to see where you would like it to lie. You want to lay your base block so the shorter side is the top/bottom measurement; you're adding width with the strips.
Then I laid my ruler down the center of that strip and carefully slid the strip out from under the ruler. Be careful not to shift the base block. Now make a single cut.
Repeat these steps two more times, once on each side of the original strip.
(Here is a totally scrappy example. The strip on the right got too close to the edge ... oops.)
(Here is one where I chose red, black & gray for all 3 strips. I made the center strip from one set of fabrics, but the two outside strips are cut from the same block and flipped.)
(I thought I'd try another one that was coordinating. All three strips use different fabrics, but the same color progression.)
Another copy of the tutorial is here.


Is this our block for January for Stash Bee? :)
ReplyDeleteWould it be cheating, but totally okay, to use a moda mini charm pack? The blocks are 2.5 inches...So they might coordinate more than scraps, but I think it'd still be pretty. Let me know what you think.
Also - I love the red and black and grey. Super cool color combo. Although I might be biased because that's a quilt I've got on my bucket list ;)
I think mini charms would be super cute. I'm all for that--totally NOT cheating. I have several of them myself, but I'm using them to follow along with the series over at A Quilting Life, so I didn't even think of using them. Great idea!
DeleteHeather, great instructions for a fun block. Can't wait to get started!!
ReplyDeleteI can't wait to get started! I can never have enough fabric scraps... so I keep shopping. I discovered this little gem and thought I'd share for anyone looking for an inexpensive way to expand their modern fabric stash. I am totally aware that the purpose of this bee is to de-stash, also, I can't help myself. It's only $10!
ReplyDeletehttp://modkidboutique.com/ScrapBag.html
Thanks, that looks like fun!
ReplyDelete